

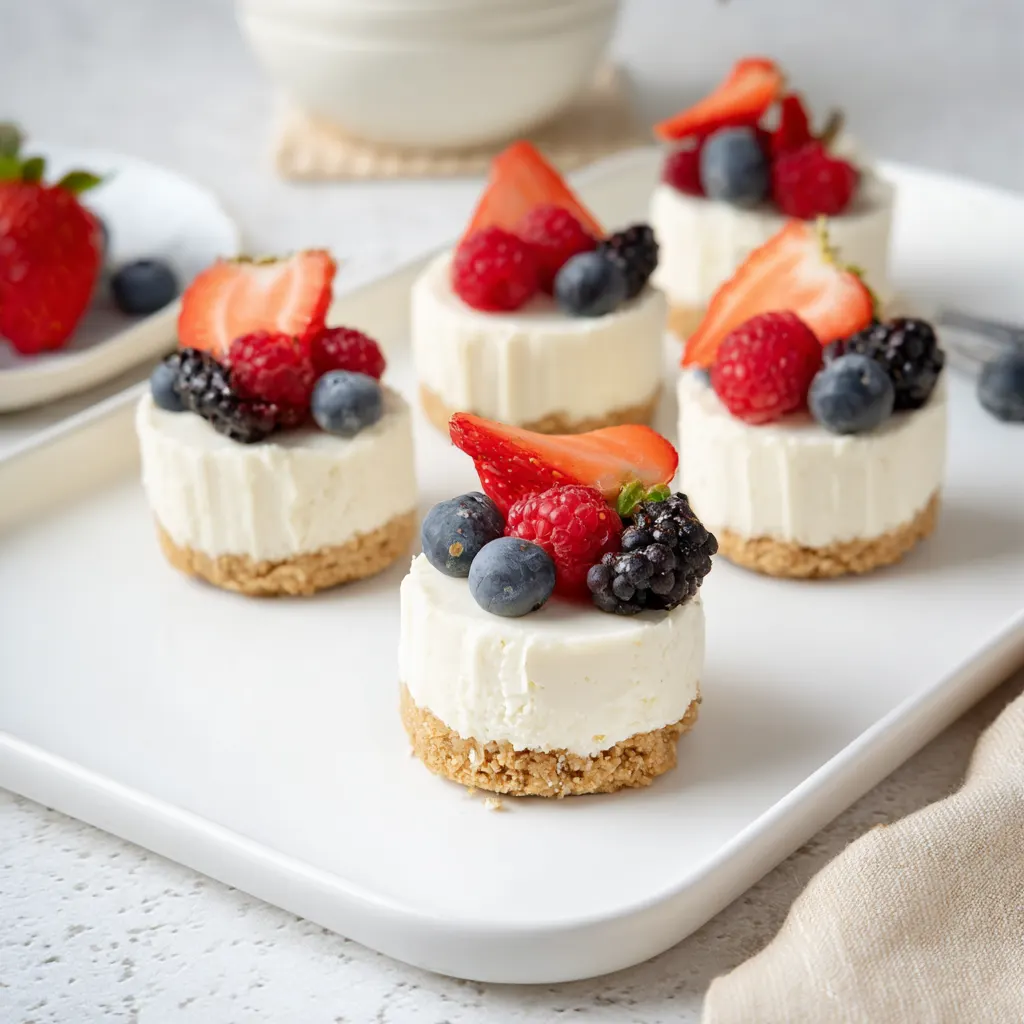
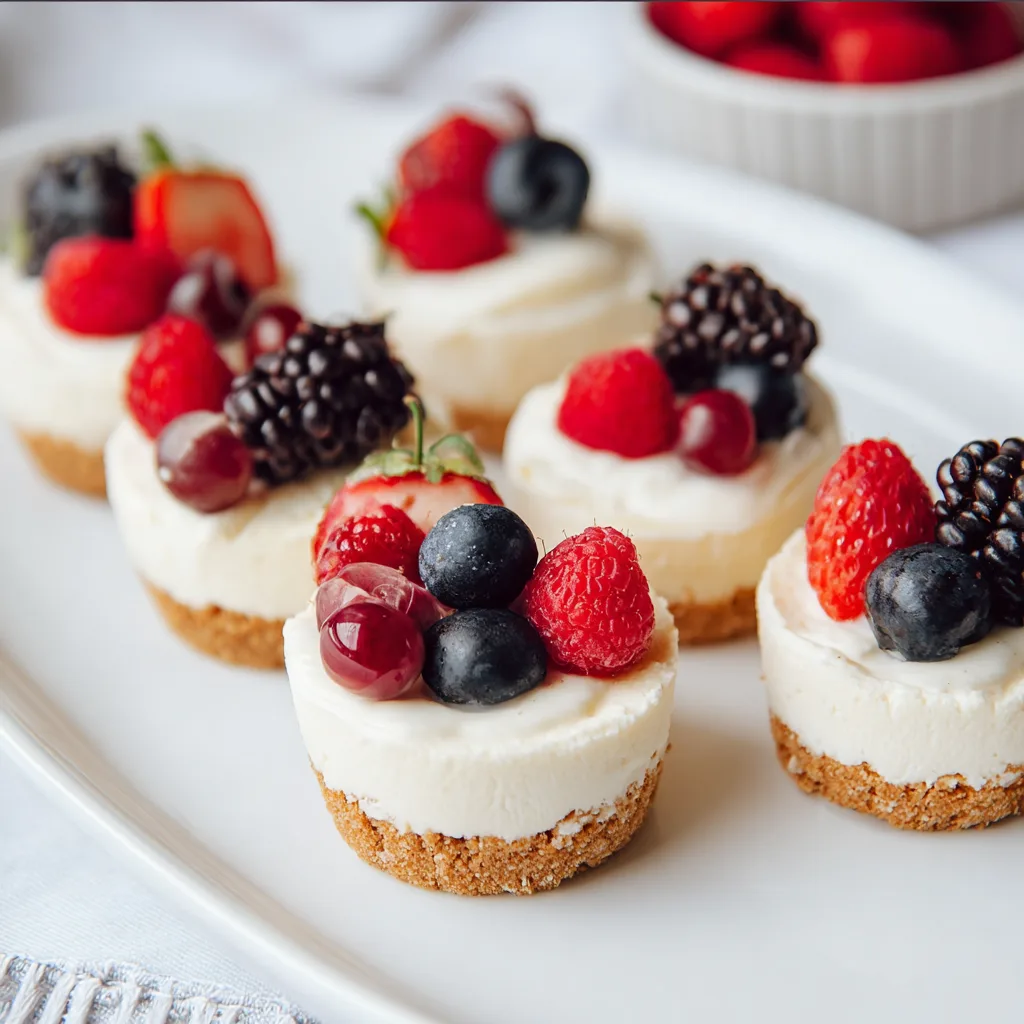
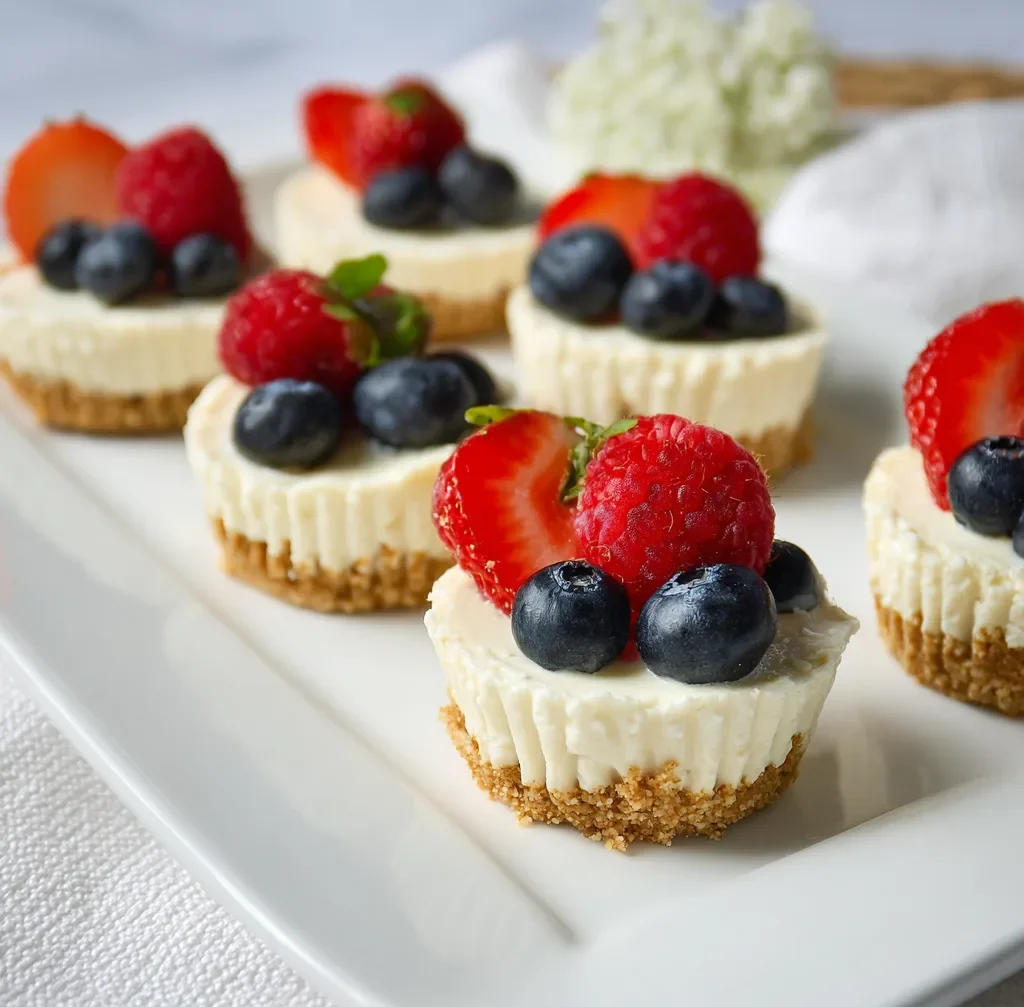
Mini no-bake cheesecakes are the perfect indulgence for those who love creamy, decadent desserts but don’t want to spend hours in the kitchen. Whether you are a beginner baker or someone who wants a quicker alternative to traditional cheesecakes, these mini treats are your go-to recipe! With a crunchy graham cracker crust and a rich, velvety filling, these cheesecakes are easy to make and ideal for portion control. In this guide, we will not only show you how to make them but also give you tips, tricks, and variations to personalize the recipe.
What Are Mini No-Bake Cheesecakes?
Mini no-bake cheesecakes are individual servings of cheesecake that don’t require baking in the oven. They are perfect for when you crave a rich dessert without the hassle of preheating the oven. These mini cheesecakes feature a smooth, mousse-like filling, which is made by folding homemade whipped cream into cream cheese and other ingredients. The result is a light, airy texture that melts in your mouth. The crust, typically made from crushed graham crackers, provides a buttery crunch to balance the creaminess of the filling.
Characteristics of Mini No-Bake Cheesecakes
-
No baking required: The filling is set in the refrigerator, making it simple and easy to prepare.
-
Portion-controlled: Each cheesecake is served individually, so it’s perfect for parties or just a sweet, single-serving treat.
-
Creamy and rich: The whipped cream mixed into the filling gives it a fluffy, mousse-like consistency.
-
Customizable toppings: These cheesecakes can be topped with a variety of delicious toppings to suit your taste.
Why Choose Mini No-Bake Cheesecakes?
There are plenty of reasons why mini no-bake cheesecakes have gained popularity, especially for gatherings or when you want a quick dessert option. Here are a few reasons why you should consider making mini no-bake cheesecakes for your next event or indulgent treat:
1. Convenient and Quick to Make
Unlike traditional cheesecakes that require a long time in the oven, mini no-bake cheesecakes can be prepared in less than 30 minutes, and they set in the fridge. There’s no need to wait for the oven to preheat, and you don’t have to worry about baking times. After a few hours in the fridge, your mini cheesecakes are ready to be enjoyed!
2. Perfect for Portion Control
Mini no-bake cheesecakes are great for portion control. Each serving is pre-measured and easy to serve, making them ideal for parties, holidays, or any occasion where guests can help themselves. Plus, since they’re small, they help satisfy your dessert cravings without overindulging.
3. Versatile and Customizable
The beauty of mini no-bake cheesecakes lies in their versatility. You can adjust the flavor of the crust and topping to fit your personal preferences. For example, you can swap the graham cracker crust for crushed cookies or add fruit preserves, chocolate ganache, or whipped cream on top. The possibilities are endless!
How to Make Mini No-Bake Cheesecakes
Making mini no-bake cheesecakes is simple, and with the right ingredients and a few tips, you’ll be able to make perfect cheesecakes every time. Follow these steps to create your own mini cheesecakes:
Ingredients You’ll Need:
For the Graham Cracker Crust:
-
2 cups (240g) graham cracker crumbs (about 16 full graham crackers)
-
1/3 cup (67g) brown sugar
-
1/2 cup (113g) unsalted butter, melted
For the Cheesecake Filling:
-
1 cup (240ml) cold heavy cream or heavy whipping cream
-
16 ounces (452g) full-fat brick cream cheese, softened
-
1/3 cup (67g) granulated sugar
-
2 tablespoons (30g) sour cream or plain yogurt, at room temperature
-
1 teaspoon fresh lemon juice
-
1/2 teaspoon pure vanilla extract
Optional Toppings:
-
Fresh berries (strawberries, blueberries, raspberries)
-
Chocolate ganache
-
Lemon curd
-
Fruit preserves or apple butter

Tips and Tricks for Perfect Mini No-Bake Cheesecakes
To ensure that your mini no-bake cheesecakes turn out just right every time, here are some essential tips and tricks you can follow. Whether you’re a first-time baker or an experienced one, these pointers will help you avoid common mistakes and make the process even smoother.
1. Whip the Cream to Stiff Peaks
The most crucial step in this recipe is whipping the heavy cream into stiff peaks. The whipped cream helps to solidify the filling and gives it that light, mousse-like consistency. Make sure your heavy cream is very cold before whipping it. Use a hand mixer or stand mixer to whip it at medium-high speed until stiff peaks form.
Tip: If the cream isn’t whipped properly, the filling may turn out too soft and won’t hold its shape.
2. Use Full-Fat Cream Cheese
For the creamiest, thickest cheesecake filling, always use full-fat cream cheese. Avoid low-fat or spreadable cream cheese as these won’t give you the same texture or flavor. Full-fat cream cheese provides the perfect richness needed for this dessert. Always soften the cream cheese to room temperature before mixing it, as cold cream cheese can cause lumps in the filling.
Tip: To soften cream cheese quickly, cut it into smaller pieces and let it sit at room temperature for about 15-20 minutes.
3. Be Gentle When Folding in the Whipped Cream
Once the whipped cream is ready, gently fold it into the cream cheese mixture. Use a silicone spatula and fold in several turns to combine the ingredients without deflating the whipped cream. Be patient, as rushing through this step can affect the texture of your cheesecake filling.
Tip: To avoid deflating the whipped cream, use a folding motion—lift the mixture from the bottom of the bowl and fold it over the top.
4. Chill, Don’t Freeze
Patience is key when making no-bake cheesecakes. While it’s tempting to speed up the chilling process by placing the cheesecakes in the freezer, avoid this! Freezing causes the crust to freeze before the filling, which results in a hard crust that’s difficult to bite into.
Tip: Chill your mini cheesecakes in the fridge for at least 3 hours, but they can be stored for up to 2 days. The longer they chill, the firmer and more stable they become.
5. Serve with Creative Toppings
While mini no-bake cheesecakes are delightful on their own, adding toppings can take them to the next level. Consider the following ideas:
-
Fresh fruits: Strawberries, blueberries, raspberries, or even kiwi work wonderfully.
-
Chocolate ganache: Pour over the mini cheesecakes for an indulgent touch.
-
Lemon curd: Brighten up the flavor with tangy lemon curd.
-
Fruit preserves: Use strawberry, raspberry, or apricot preserves for a sweet twist.
-
Caramel or hot fudge sauce: For a rich, decadent experience, drizzle caramel or chocolate sauce over the top.
Tip: If you’re using any sauces, refrigerate the cheesecakes with the toppings already applied to prevent the toppings from melting or running off.
6. Use the Right Tools
Using the right tools makes the process much easier and more enjoyable. Here are a few items you’ll find useful:
-
Muffin pans: Standard 12-count muffin pans work best for this recipe.
-
Cupcake liners: These are crucial to help you remove the cheesecakes from the pan without damaging them.
-
Electric mixer: To whip the cream and blend the filling efficiently, an electric hand mixer or stand mixer is the best option.
-
Piping bags: For a neat and professional finish, use a piping bag with a star or round tip to transfer the filling into the muffin liners.
Variations and Customizations for Mini No-Bake Cheesecakes
The beauty of mini no-bake cheesecakes lies in their versatility. You can experiment with different flavors, crusts, and toppings to create a cheesecake that matches your preferences. Here are some creative variations you can try:
1. Lemon Mini No-Bake Cheesecakes
For a refreshing twist, you can turn these cheesecakes into a citrusy delight. Add 2 tablespoons of fresh lemon juice (in addition to the original teaspoon) and 2 teaspoons of lemon zest to the filling for a more prominent lemon flavor. You can also swap the sour cream for extra lemon juice for an even tangier taste.
Topping Idea: Top with lemon curd and fresh blueberries for a citrusy and fruity combination.
2. Chocolate Mini No-Bake Cheesecakes
Love chocolate? Then try this variation! Simply add 1/4 cup of cocoa powder or melted chocolate to the cheesecake filling. You can also mix in some chocolate chips for added texture.
Topping Idea: Drizzle with chocolate ganache or sprinkle with crushed cookies for a decadent treat.
3. Oreo Mini No-Bake Cheesecakes
For a fun twist, use crushed Oreo cookies for the crust. You can even add crushed Oreos into the cheesecake filling for extra chocolatey flavor. This creates a delicious Oreo-inspired cheesecake.
Topping Idea: Top with crushed Oreos and whipped cream for a classic look.
4. Fruit Mini No-Bake Cheesecakes
If you’re a fan of fruity desserts, try incorporating fruit into the filling. You can blend fresh berries into the filling for a burst of flavor or use fruit preserves to add sweetness.
Topping Idea: Fresh fruit like strawberries, raspberries, or mango slices make for a bright and beautiful topping.
5. Nutty Mini No-Bake Cheesecakes
For a crunchier variation, try adding crushed nuts, like pecans, almonds, or walnuts, into the crust or sprinkle them over the top for a nutty texture. You can even incorporate almond or hazelnut extract into the filling for an added nutty flavor.
How to Serve and Store Mini No-Bake Cheesecakes
Serving Your Mini No-Bake Cheesecakes
Once your mini no-bake cheesecakes have set in the fridge and are ready to be served, you can enhance the experience with the perfect serving method. Here are a few tips for serving these mini treats at their best:
1. Serve Chilled
Mini no-bake cheesecakes are best served chilled. They hold their shape and texture better when they are cold, giving you that delightful, creamy experience in every bite. After removing the cheesecakes from the fridge, you can let them sit at room temperature for a few minutes, but don’t leave them out too long or they will begin to soften.
2. Garnish Creatively
You can serve your mini cheesecakes with a variety of garnishes that add texture and flavor. Fresh berries like raspberries, strawberries, or blueberries can be a beautiful topping. If you want to go a step further, add a dollop of whipped cream or drizzle with a fruit syrup, caramel, or chocolate ganache. These toppings add an extra layer of flavor and sophistication to your mini cheesecakes.
Serving Tip: If you’re hosting a party or event, arrange the cheesecakes on a platter with different toppings on the side so guests can personalize their own servings.
3. Consider Individual Packaging
If you’re serving these mini cheesecakes as a part of a gift or for take-home portions, consider packaging them individually in small containers or jars. This adds a cute, personalized touch and makes them easy for guests to take home.

Storing Mini No-Bake Cheesecakes
Mini no-bake cheesecakes are best stored in the fridge to maintain their freshness and creamy texture. Here’s how you can store them to keep them as delicious as possible:
1. Refrigeration
Once your mini cheesecakes have set and you’re not serving them immediately, cover them tightly with plastic wrap or aluminum foil and store them in the fridge. They will stay fresh for up to 5 days. Make sure they’re kept in an airtight container to avoid absorbing any odors from other foods in the fridge.
Tip: If you’re storing them in muffin pans, cover them with plastic wrap or place them in a large resealable plastic bag to protect them from moisture.
2. Freezing for Longer Storage
If you have leftover mini no-bake cheesecakes or want to prepare them in advance, freezing is an option. Here’s how to freeze your cheesecakes:
-
Once the cheesecakes have set and you’re ready to freeze them, carefully remove them from the muffin pan (keeping the cupcake liners on).
-
Place the mini cheesecakes on a baking sheet lined with parchment paper and freeze them for 1-2 hours.
-
After freezing, transfer them to a freezer-safe container or zip-top bag. You can store them for up to 3 months in the freezer.
Tip: When ready to serve, thaw the mini cheesecakes in the refrigerator for at least 24 hours before serving for the best texture.
FAQs on Mini No-Bake Cheesecakes
1. Can I make mini no-bake cheesecakes ahead of time?
Yes! In fact, these mini cheesecakes can be made up to 1-2 days in advance. They store well in the refrigerator and maintain their creamy texture when chilled. Just make sure to cover them tightly to prevent them from absorbing other odors in the fridge.
2. What if I don’t have graham crackers?
If graham crackers aren’t available in your area, you can substitute them with crushed digestive biscuits. Use the same amount (2 cups) and adjust the sugar based on the sweetness of your biscuits.
3. Can I freeze mini no-bake cheesecakes?
Yes, mini no-bake cheesecakes freeze well. After they’ve chilled in the refrigerator for at least 3 hours, remove them from the muffin pans (keeping the liners on), and store them in a freezer-friendly container. Freeze for up to 3 months, and thaw in the refrigerator before serving.
4. Can I use low-fat cream cheese?
While full-fat cream cheese is recommended for the best texture and flavor, you can use low-fat cream cheese if you prefer. Just be aware that the texture may not be as creamy, and the filling could be slightly less stable.
Final Thoughts: A Sweet and Easy Dessert for Any Occasion
Mini no-bake cheesecakes are a fantastic dessert choice for anyone looking for a simple yet indulgent treat. Whether you’re preparing them for a special occasion, a dinner party, or just a sweet snack for yourself, these cheesecakes are sure to impress. With their creamy filling, buttery crust, and endless topping options, they cater to every taste preference.
The beauty of mini no-bake cheesecakes is that they are versatile, easy to make, and can be customized with various flavors and toppings. From the classic graham cracker crust to the exciting additions of chocolate, fruits, or even a swirl of caramel, this dessert is one you can make your own.\
Delicious Mini No-Bake Cheesecakes Recipe
Ingredients
Method
- Prepare the Muffin Pan: Line a 12-count muffin pan with cupcake liners.
- Make the Crust: In a medium bowl, combine graham cracker crumbs, brown sugar, and melted butter. Mix until it resembles wet sand. Spoon 1 1/2 tablespoons of mixture into each muffin cup and press it down firmly.
- Optional Step – Bake the Crust: For a sturdier crust, bake at 350°F (177°C) for 5 minutes, then cool for 10 minutes.
- Make the Cheesecake Filling: Whip cold heavy cream into stiff peaks. In another bowl, beat cream cheese and sugar until smooth. Add sour cream, lemon juice, and vanilla extract, and mix until fully combined. Gently fold in the whipped cream.
- Assemble: Spoon or pipe the cheesecake filling into each muffin liner on top of the crust.
- Chill: Refrigerate for at least 3 hours until set.
- Serve: Top with optional toppings like fresh berries, chocolate ganache, or fruit preserves before serving.
Notes
- For firmer crusts, bake for 5 minutes.
- Use full-fat cream cheese for best results.
- Store in the fridge for up to 5 days. For freezing, freeze for up to 3 months and thaw in the fridge.
- Customize the filling with flavor variations like lemon zest, chocolate, or fruit puree.
- Calories: 270
- Fat: 19g
- Carbohydrates: 22g
- Protein: 3g
- Sugar: 14g